How to insert a picture in Excel header
Sometimes, we might need to insert pictures in the Excel header for many reasons. It could be a company logo or any title in an image format. So, how to insert a picture in Excel header?
Well, go to the “Insert” ribbon. Click on the drop-down arrow of the “Text” option. Click on the “Header & Footer” option. It will open the “Header & Footer” ribbon. Click on a header and click on the “Picture” option under the “Header & Footer Elements” section. Insert your picture from any source.
How to insert a picture in Excel header (Step by Step)
Inserting pictures in the Excel header is an easy task. We can insert a picture in just 2 steps within a few clicks. Let’s see our first step.
Step 1: Enable the “Header & Footer” Ribbon
Before inserting a picture in the Excel header, we must enable the “Header & Footer” ribbon. How can we do that?
Well, go to the “Insert” ribbon. At the far right corner of that ribbon, click on the drop-down menu of the “Text” option.
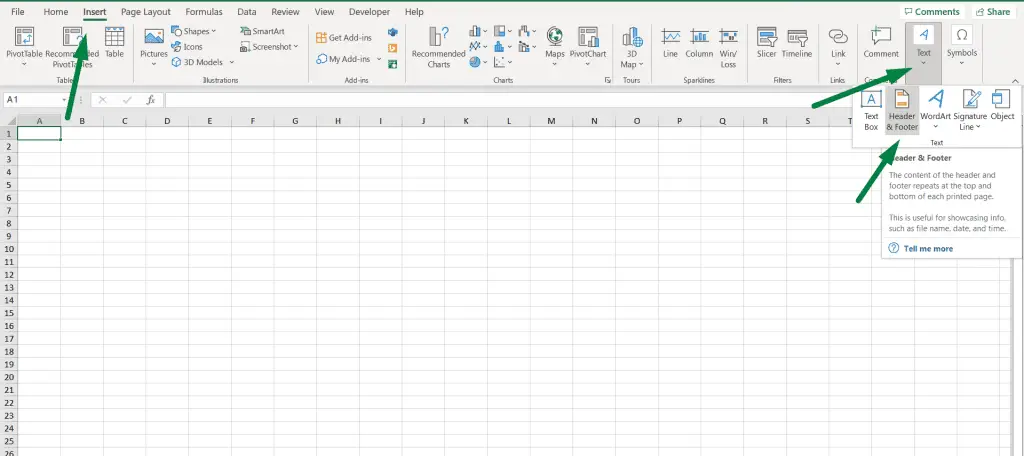
You will find the “Header & Footer” option, among other options. Click on that.
It will open the “Header & Footer” ribbon.
Step 2: Insert Picture In Excel Header
Now that we have enabled the “Header & Footer” ribbon, we can easily insert pictures in the Excel header. When you enable the “Header & Footer” ribbon, you will find the ribbon at the far right corner of the ribbon bar.
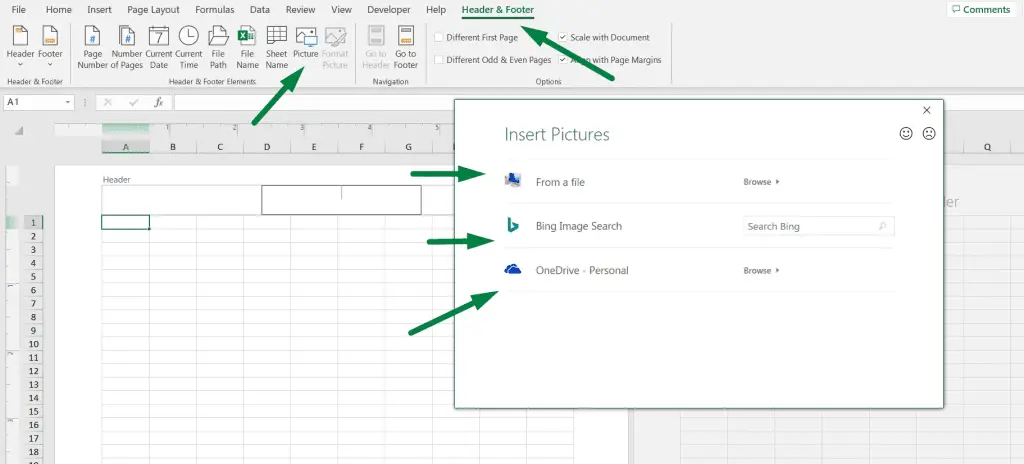
Click on the header where you want to insert a picture. Then click the “Picture” option under the “Header & Footer Elements” section. This will open a box like this. From there, you can select the source from where you want to choose the picture.
Select your source and choose your picture. Excel will add that picture in the header.
This way, you can easily insert pictures in any Excel header.
Besides, in a similar way, you can also insert pictures in the footer section too!
Here is another thing: When you’re inserting the picture in the header, you have the option to set it for printing as well as repeating it on all the pages.
Even though you can’t see the header when the “Header & Footer” tab is not active, you can see the preview on the print options. To get there, you can press “Ctrl + P,” and it will open the printing preview options, where you will get to see the picture you inserted in the header.
Resize the Picture in the Excel header
You can also resize the picture you just inserted in the header section. Here’s how you will do it:
- Click on the “Header & Footer” tab again.
- You will find a “Format Picture” option just beside the “Picture” option.
- You will have three options in there: Size, Picture, and Alt Text.
- You can resize your picture, such as height, width, and even scale, in the “Size” section.
- When you’re done, click OK to save your progress.
Summary
We can easily insert a picture in the Excel header in just a few steps.
- Go to the “Insert” ribbon.
- Click on the drop-down arrow of the “Text” option.
- Click on the “Header & Footer” option.
- This will open the “Header & Footer” ribbon.
- Click on a header and click on the “Picture” option under the “Header & Footer Elements” section.
- Insert your picture from any source.
Conclusion
That was easy, right? You can now easily insert your pictures, and even multiple items into the header and even footer section exactly the same way. Not only that, you can also resize the pictures however you like.
Let me know if there are any more similar things you want to know.

Hi! I’m Ahsanul Haque, a graduate student majoring in marketing at Bangladesh University of Professionals. And I’m here to share what I learned about analytics tools and learn from you.