How to remove year from date in Excel
We need to know how to remove year from date in Excel for many reasons. For example, we have a list of customer payable dates. And we want to know only the date and sort them.
Another example could be you want to send each of your customers birthday wishes. Now, you have a long list, and you don’t need the year from the list. You want to remove the year from the date in Excel.
So, how to remove year from date in Excel?
Well, select the cell. Go to the “Home” ribbon. Click on the drop-down menu under the “Number” section. Then click on the “More Number Formats” option. Go to the “Date” section and select “3-14” or “14-Mar”. Or go to the “Custom” section and insert “dd-mm” in the box. You can also use the CONCATENATE or TEXT function.
That’s just an overview. We will learn to remove year from date in Excel using these three options in detail. Let’s dive into it.
How to Remove Year From Date in Excel (Using Date and Custom Number Formatting)
We can easily remove year from date in Excel in just a few steps. In this section, we will learn how to use custom number formatting to remove years from dates in Excel.
This is the most effective and easiest way to remove year from date in Excel.
We can use 2 methods. Let’s look at the first one.
First, we need to select the cell or multiple cells from where we want to remove the year from the date.
So, select the cells, and then go to the “Home” ribbon.
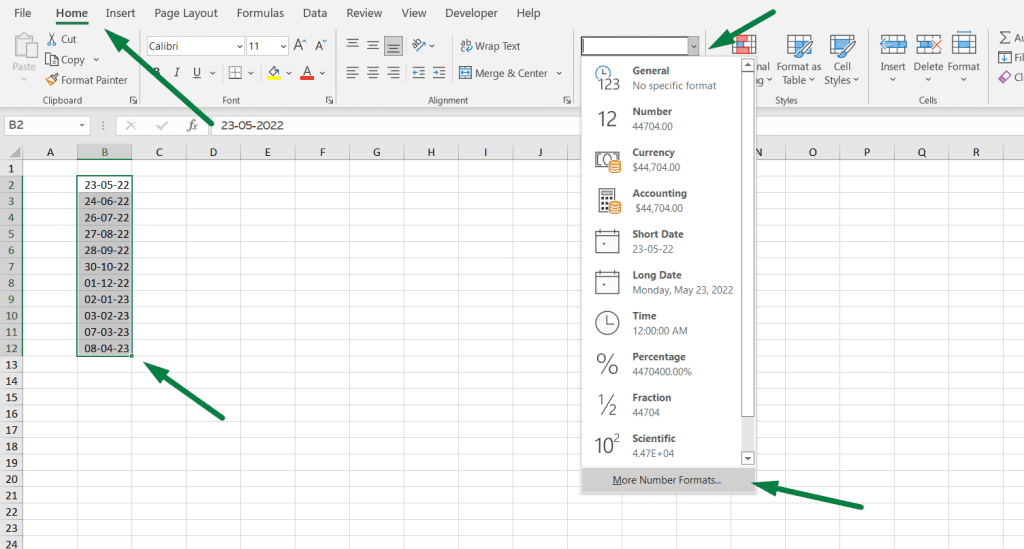
Click on the drop-down menu under the “Number” section. At the bottom, you will find an option named “More Number Formats.” Click on that.
Or you can use shortcuts. The shortcut to open “Custom Number Formatting” is:
- Ctrl + 1
Or, click on the small arrow sign at the bottom of the corner.
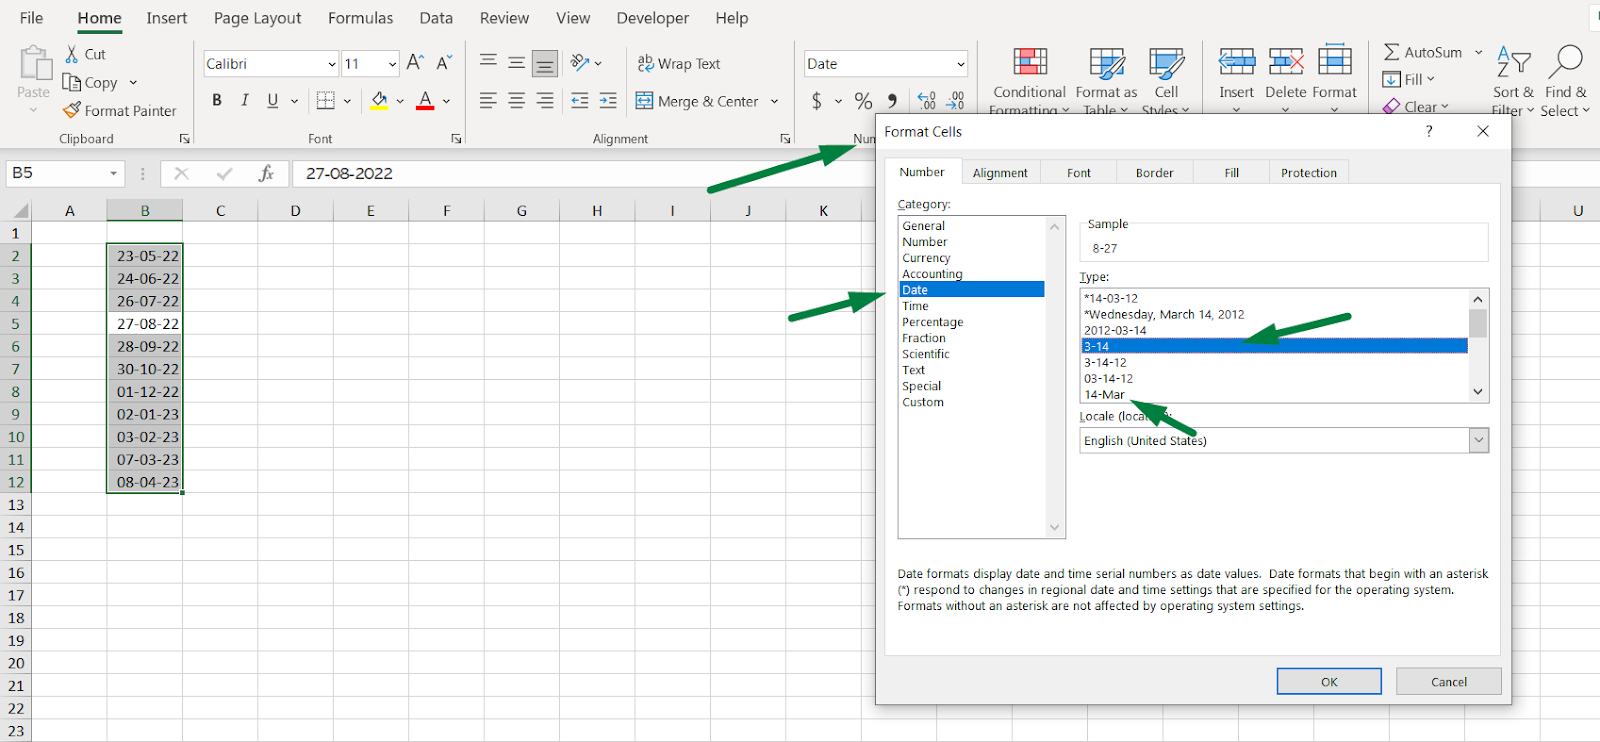
This will open this box named “Format Cells” among 5 other sections. Click on the “Number” section if you are already in that section.
Date Option
Click on the “Date” option there. You will see a range of options there. There are only two options where you can select only the date and month option.
It means that with these two options, Excel will only show the day and the month, removing the year.
Those two options are:
- “3-14”
- “14-Mar”
What do these options mean?
Well, with the “3-14” option, “3” is the “Month,” and “14” is the “Day”. So, when you choose this option, excel will show the inserted data in only a day and month. And it will remove the year from showing.
So, if the data you inserted is “23-05-22”, excel will show the data as “5-23”.
On the other hand, with the “14-Mar” option, “14” is the “Day,” and “Mar” is short for “March,” which is the month. So, with this option, Excel will show the data or cell in day and month. Months will be shown with only the first three letters.
So, if the data you inserted is “23-05-22”, excel will show the data as “23-May”.
Now, let’s look at another option to customize the date cell.
Custom Option
With this custom option, we can show the data as we want for the date format. Generally, when we put a date in a column, the date can be shown in many formats. Those are:
- dd-mm-yy
- ddd-mm-yy
- dddd-mm-yy
- dd-mm-yy
- dd-mmm-yy
- dd-mmmm-yy
- dd-mm-yy
- dd-mm-yyyy
We will discuss these in the later part of this section.
Now, we can use this while removing the year from the date. We simply need to do one thing. Change the format structure. So, now, we are going to change the format.
As usual, select the cells and then go to the “Home” ribbon.
Click on the drop-down menu under the “Number” section. At the bottom, you will find an option named “More Number Formats.” Click on that.
Or you can use shortcuts. The shortcut to open “Custom Number Formatting” is:
- Ctrl + 1
Or, click on the small arrow sign at the bottom of the corner.
This will open this box named “Format Cells” among 5 other sections. Click on the “Custom” section.
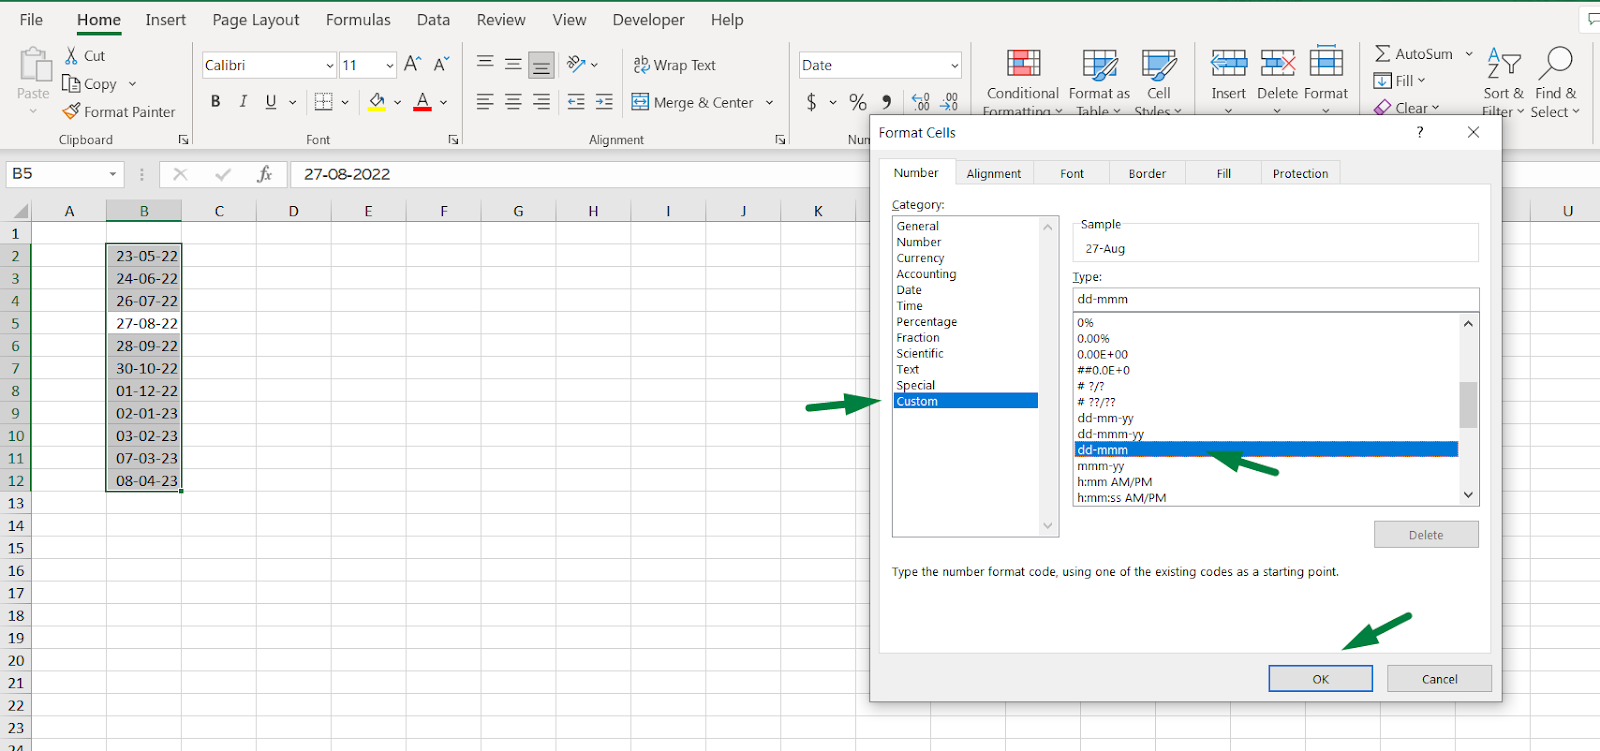
Now, If your format is “dd-mm-yy,” change it to “dd-mm” or “dd-mmm.” As you can see, we remove the “yy” part from the format.
We can remove years from dates in Excel using custom date formatting.
A quick note: If you want to put “/” between day and month instead of “-,” you can easily do it. Just insert “-” while formatting. The formal structure will be “dd/mm or dd/mmm.”
As we said before, we will talk about what another custom date format means. So, here it is.
Now, what does all these mean?
d/dd/ddd/dddd
- When you use “d,” this shows only one number/numeric value of the day. For example, if it is the 6th day of the month, it will only show “6”.
- On the other hand, “mm” shows the number of days, which requires two digits. For example, if it is 23, it will show “23”.
- “mmm” shows the first three letters of the day. For example, if it is Friday, it will only show “Fri.”
- “mmmm” shows the full name of the day. For example, it will only show “Monday” if it is Monday.
m/mm/mmm/mmmm
- When you use “m,” this shows only one month number. For example, if it is July, it will only show “6”.
- On the other hand, “mm” shows the number of the month, which requires two digits. For example, if it is November, it will show “11”.
- “mmm” shows the first three letters of the month. For example, if it is October, it will only show “Oct.”
- “mmmm” shows the full name of the month. For example, it will only show “October” if it is October.
yy/yyyy
- “yy” shows the last two digits of the year. For example, if it is 2022, it will only show “22”.
- On the other hand, “yyyy” shows the full or four digits of the year. For example, if it is 2022, it will only show “2022”.
Now, let’s go to our second method.
How to Remove Year From Date in Excel (Using CONCATENATE Function)
In this section, we will learn how to remove year from date using the “CONCATENATE” function.
The “CONCATENATE” function joins or combines text or texts from different cells or parts of a single cell into a single cell.
So, select anywhere you want to insert your formula and put it there.
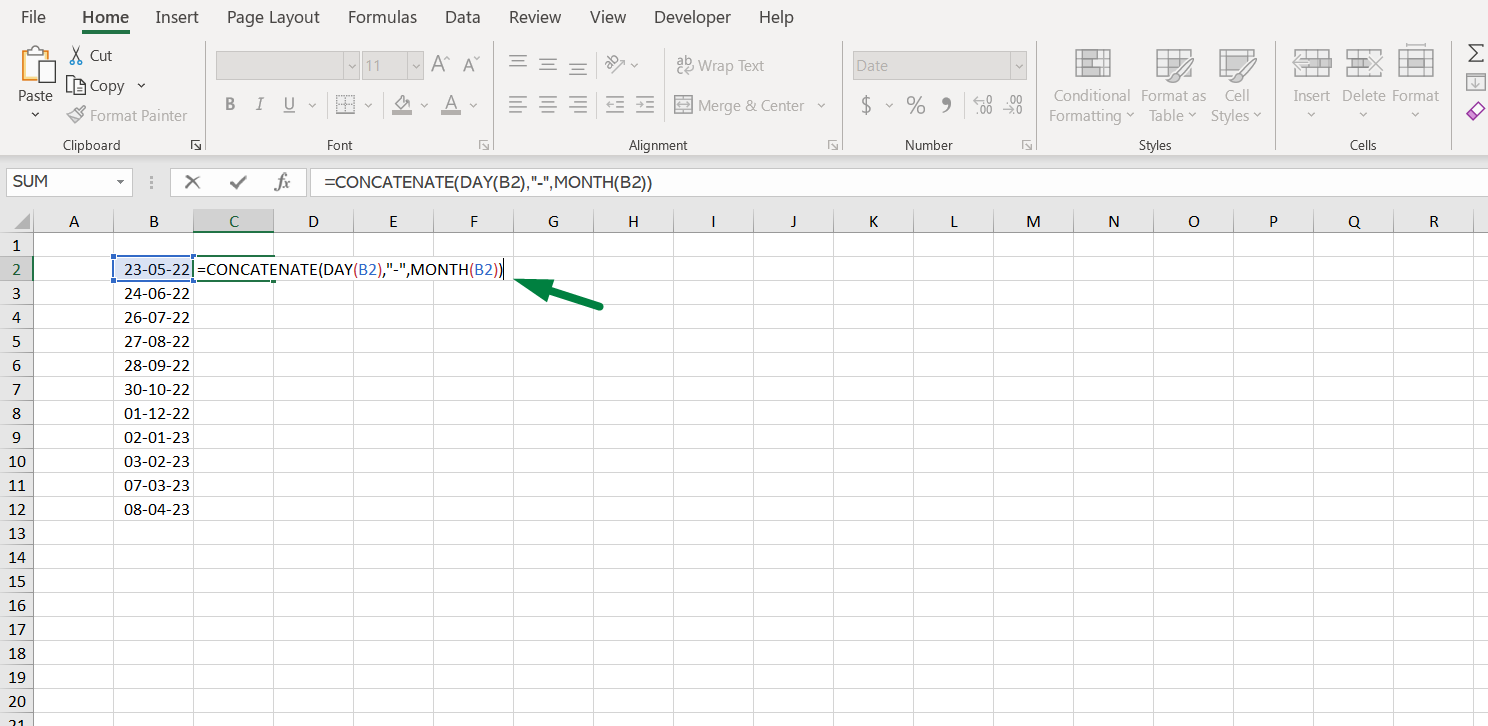
The formula is,
=CONCATENATE(DAY(B2),”-“,MONTH(B2))
There were also “DAY” and “MONTH” functions.
The general formula is =CONCATENATE(text1,text2,…)
Explanation:
- We used 3 arguments.
- First, The “DAY” function shows only the day in a date. And we want to show the day of the B2 cell.
- Second, we added “-” (hyphen) between the day and month. (You can also use ”/” if you want).
- Third, The “MONTH” function shows only the month in a date. And we want to show the month of B2 cells.
If you have a long list and need to autofill the whole column, here is the article on auto-filling a formula in Excel.
This is how you can easily remove year from date.
How to Remove Year From Date in Excel (Using TEXT Function)
In this section, we will learn how to remove year from date using the “TEXT” function.
What the “TEXT” function does is it converts a number to text in a number format.
So, select anywhere you want to insert your formula and put it there.
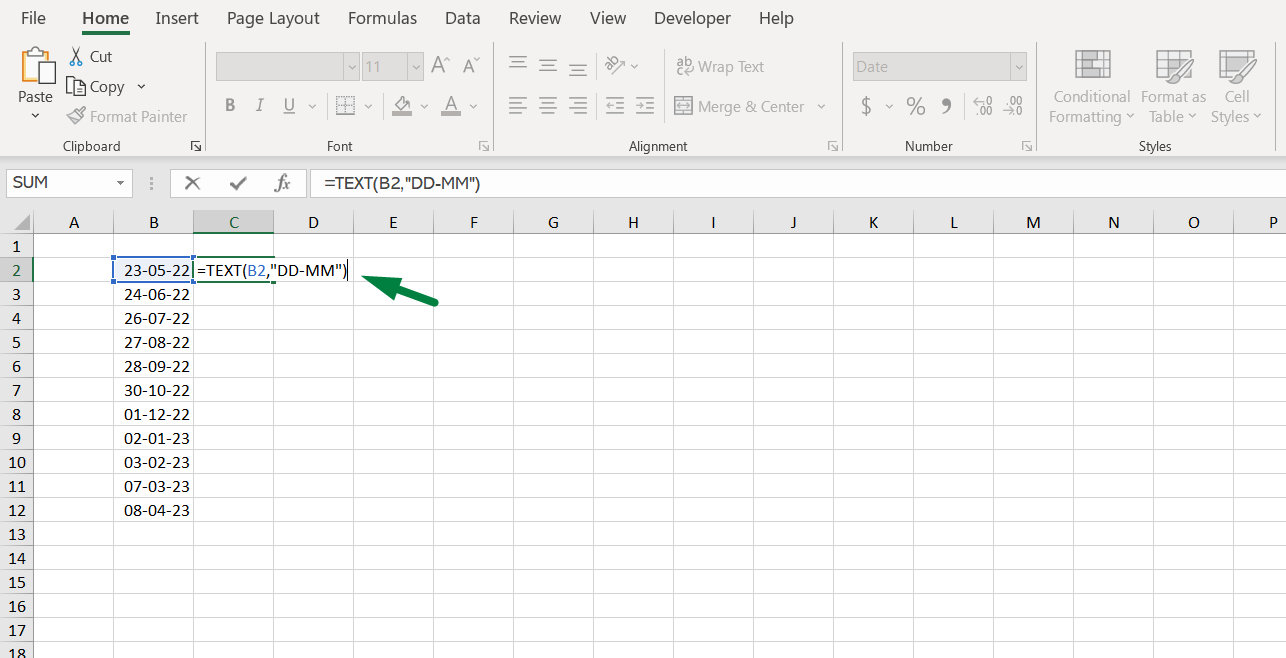
The formula is,
=TEXT(B2,”DD-MM”)
Or, =TEXT(B2,”dd/mm”)
The general formula is =TEXT (value, format_text)
Explanation:
- B2 is the cell where we want to extract the day and month.
- “dd/mm” is the date format we want to see. We also discussed all the possible date formats in the previous section.
If you have a long list and need to autofill the whole column, here is the article on auto-filling a formula in Excel.
This is how you can easily remove year from date using the function.
Summary
We can remove year from date in Excel in 4 ways.
- Go to the “Home” ribbon > Click on the drop-down menu under the “Number” section > At the bottom, click on the “More Number Formats” option > Click on the “Number” > Select “3-14” or “14-Mar” option.
- Go to the “Home” ribbon > Click on the drop-down menu under the “Number” section > At the bottom, click on the “More Number Formats” option > Click on the “Custom” > Insert “dd-mm” or “dd-mmm” in the box.
- You can use the “CONCATENATE” function. Insert this formula =CONCATENATE(DAY(B2),”-“,MONTH(B2)). Replace B2 with the cell where you want to remove the year.
- You can use the “TEXT” function. Insert this formula =TEXT(B2,”dd/mm”). Replace B2 with the cell where you want to remove the year.
FAQs
How Do I Remove The Month and Year in Excel?
You can use the “CONCATENATE” or “TEXT” function to remove the month and year in Excel. Select any cell, insert the formula =CONCATENATE(DAY(ref_cell),”-“,MONTH(ref_cell)) or =TEXT(ref_cell,”DD-MM”). This will remove the month and year in Excel.
How Do I Separate Year From Date of Birth in Excel?
You can separate the year from the date of birth in Excel in three ways. “Home” ribbon > Click on the drop-down menu under the “Number” section > At the bottom, click on the “More Number Formats” option > Click on the “Custom” > Insert “yy” or “yyyy” in the box. Or insert these formulas, =CONCATENATE(YEAR(ref_cell)) or =TEXT(ref_cell,”yyyy”).
How Do You Remove the Year From a Date in Google Sheets?
Google Sheets works in the same way as Excel. To remove a year from a date in Google Sheets, You can use the “CONCATENATE” or “TEXT” function to remove the month and year in Excel. Select any cell, insert the formula =CONCATENATE(DAY(ref_cell),”-“,MONTH(ref_cell)) or =TEXT(ref_cell,”DD-MM”). This will remove the month and year in Excel.
Conclusion
In this article, we learned how to remove year from date in Excel in 4 different ways. We tried to cover the topic in detail. Let us know if you have any questions regarding this.
Good Luck!

Hi! I’m Ahsanul Haque, a graduate student majoring in marketing at Bangladesh University of Professionals. And I’m here to share what I learned about analytics tools and learn from you.