How to screenshot on Excel
You might need to take a screenshot in Excel many times. For example, screenshot a particular data set range or table. And add it to a presentation slide or somewhere. In another scenario, copy the data in a workbook and paste it into another worksheet as a picture.
Whatever the reason is, you can always take a screenshot in Excel. Excel comes with a built-in option for taking screenshots. But you can also ask for help from other tools as well.
So, how do you take screenshots in Excel?
You can take screenshots using the “Paste(U)” option. Select the data range. Press “Ctrl + C” to copy. Go to the “Home” ribbon. Click on the drop-down menu of the “Paste” option. Click on the “Picture (U)” option. After copying the data, press “Alt + H + V + U” to screenshot the data range.
After copying the data, right-click on the mouse, go to the “Paste Special” option, and select the “Picture (U)” option. Or you can use the “Windows + PrtScr” Key “Snipping Tool” or the “Lightshot” Tool.
This is just an overview. Let’s dive into it to learn the methods in detail.
How to Screenshot on Excel (Using Paste (U) Option)
This is the built-in option to take a screenshot in Excel. Also, this is another easy option to use. We can screenshot on excel using this option within a few clicks.
First, select the data range in which part you want to take a screenshot on Excel. To use the paste option, you need to copy the data set. So, right-click on the mouse and select the “Copy” option. Or just press “Ctrl + C.”
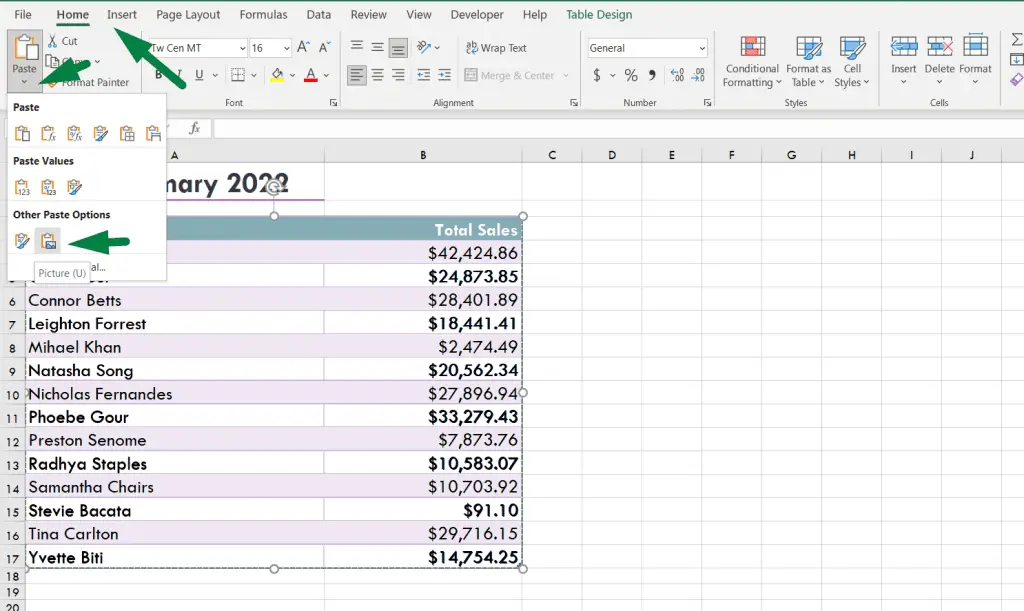
Then go to the “Home” ribbon. At the left corner of that ribbon, click on the drop-down menu of the “Paste” option. There you will find the “Picture (U)” option under the “Other Paste Options”. Click on that, and Excel will screenshot the mainly selected data range.
Or you can use a shortcut for this. After copying the data, press “Alt + H + V + U” to screenshot the data range.
After copying the data, right-click on the mouse, go to the “Paste Special” option, and select the “Picture (U)” option.
With this option, you can copy and paste any range of data into Excel.
How to Screenshot on Excel (Using the “Windows + PrtScr” Key)
This is another handy tool for taking screenshots in Excel. But the problem with this option is it takes the whole picture of the screen.
So, with this option, you can screenshot on Excel but for the whole screen.
Just go to the worksheet where you want to take the screenshot. Then press the “Windows + PrtScr” key. Your computer will store the screenshot in a folder in .png format.
How to Screenshot on Excel (Using “Snipping Tool”)
Windows has another amazing yet handy tool for taking screenshots. It is called a “Snipping Tool”. Go to the search bar of your computer. Type “Snipping Tool,” and it will pop up. When you click on that tool, you will see something like this.

If you want to screenshot a particular part of a screen or data range, click the “New” option in the snipping tool. Then select the data range where you want to take the screenshot and save it in a folder of that picture.
How to Screenshot on Excel (Using “Lightshot” Tool)
This is one of the most used and highly recommended tools to take screenshots. Go to Google, type “LightShot,” and then install the app.
When installing the app, you just need to press the “PrtScr” key to take screenshots. After pressing the “PrtScr” key, select the area where you want to take the screenshots. You can save or upload the picture on the web or cloud. It’s a very easy process.
Summary
So, to summarize all that, you can take a screenshot in Excel in 4 ways.
- Using the “Paste” option
- Select the area or data range where you want to take the screenshot.
- Press “Ctrl + C” to copy.
- Then go to the “Home” ribbon.
- At the left corner of that ribbon, click on the drop-down menu of the “Paste” option.
- There you will find the “Picture (U)” option under the “Other Paste Options”. Click on that, and Excel will screenshot the mainly selected data range.
- Or you can use a shortcut for this. After copying the data, press “Alt + H + V + U” to screenshot the data range.
- After copying the data, right-click on the mouse, go to the “Paste Special” option, and select the “Picture (U)” option.
- Using “Windows + PrtScr” Key
- Using “Snipping Tool”
- Using “Lightshot” Tool
FAQs
How Do I Take A Screenshot In Excel with the Keyboard?
You can easily take a screenshot in Excel with the keyboard. Just press the “Windows + PrtScr” Key.
What Is the Shortcut Key for Screenshots?
After copying the selected data range > Press “Alt + H + V + U” Or Just press the “Windows + PrtScr” Key.
How Do I Take a Screenshot Without a Print Screen?
You can use the pasted picture (U) option or “Windows + PrtScr” or snipping tool or lightshot app to take screenshot.
Conclusion
In this article, we tried to cover all the aspects of how to take screenshots in Excel. Now, you can easily take screenshots in Excel.
Let us know if you have any questions.
Good luck!

Hi! I’m Ahsanul Haque, a graduate student majoring in marketing at Bangladesh University of Professionals. And I’m here to share what I learned about analytics tools and learn from you.