How to set the default font in Excel
When you open a new workbook, it opens with a default font. The default font is Calibri, and the font size is 11.
It’s a great font with good readability. But you might need to change your workbook’s font and overall looks and feels.
But every time you open a new workbook, it will open the same default Calibri font in size 11. Can we change that? What is the solution?
So, you might be wondering how to set the default font in Excel.
Click on the “File” ribbon, go to the “Options” at the bottom, or press “Alt + F + T.” Then it will open a box named “Excel Options.” Select the “General” option. Choose your preferred font and size under the “While creating new workbooks” section. Select “OK”. Restart the Excel to make it work.
Now, you will learn how to set the default font in Excel.
But before that, a note.
- These options can only be found in Excel 2016 and higher.
- Changing the default font will not change the font in the existing workbooks.
So, let us get into it.
How to Set the Default Font in Excel (Step by Step)
We can set the default font in Excel in just 5 steps for a new workbook. We are going to show the steps to you with screenshots.
Let’s move to the first step.
Step 1: Click on the “File” ribbon.
Our first step is to click on the “File” ribbon at the far left corner of the ribbon section.

Just right-click on that option.
Step 2: Choose the “Options” at the bottom.
You find this range of options after clicking on the “File” ribbon option.

Choose the “Options” from there, which is at the bottom. Click on that.
Or you can skip the previous 2 steps using a shortcut.
The shortcut to the “Options” is to press “Alt + F + T.”
Step 3: Go to the “General” option.
After pressing the “Options,” Excel will open a box named “Excel Options”.
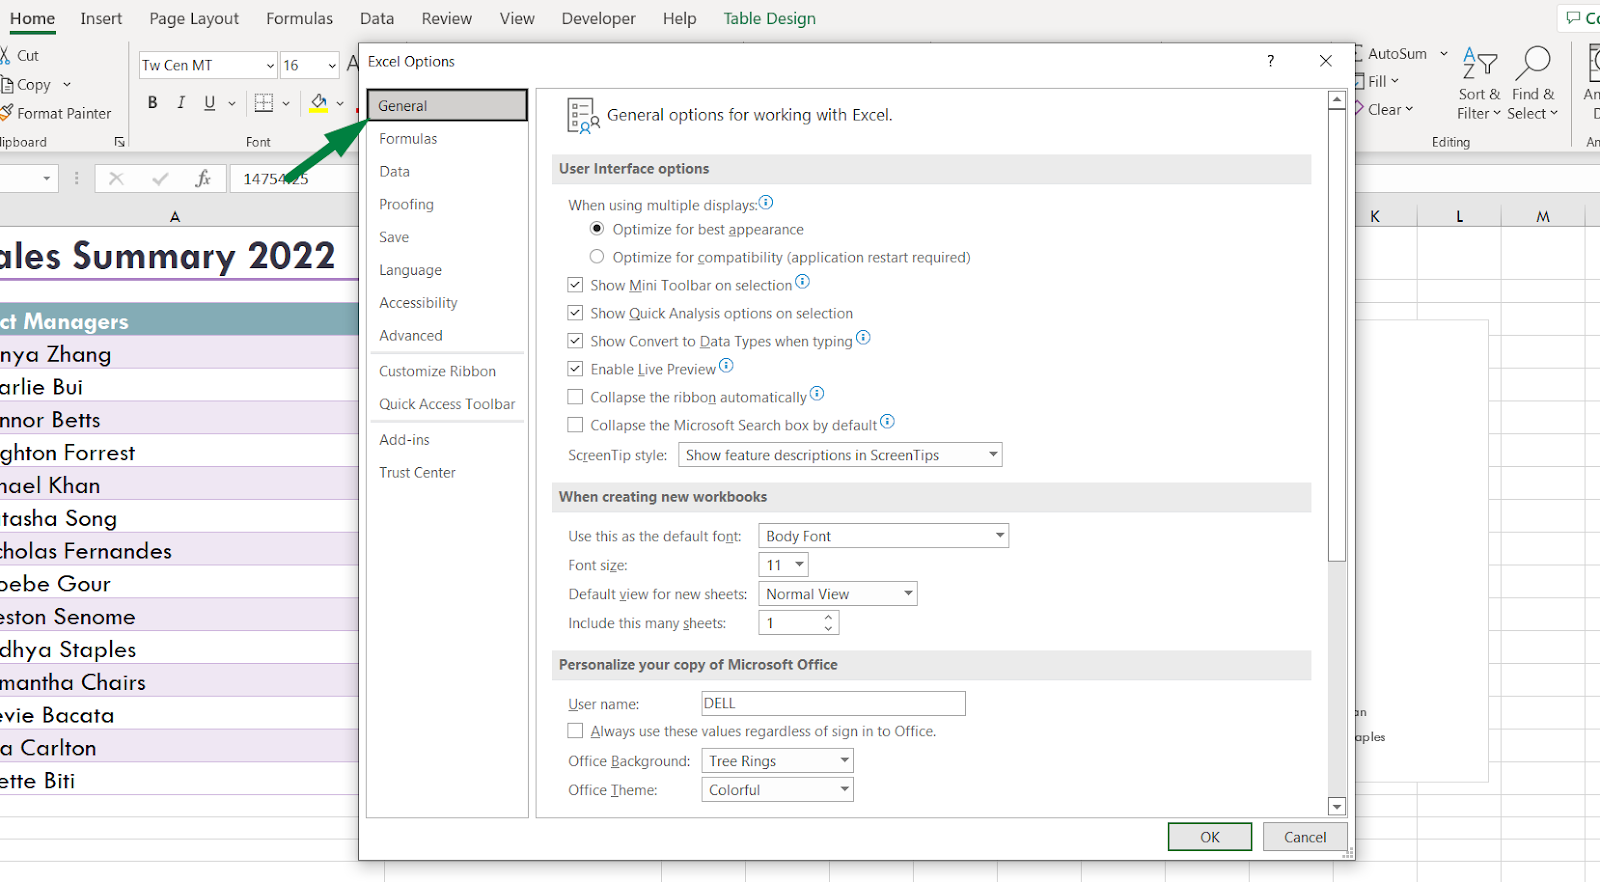
There you will find the “General” option. When you open the box, the option is selected by default.
Step 4: Choose “Default Font” and “Size” under the “While creating new workbooks” option.
This is the part where you choose the font and font size.
As mentioned, you can not set the default font for existing workbooks. You can only set the default font for the workbooks you will create in the future.
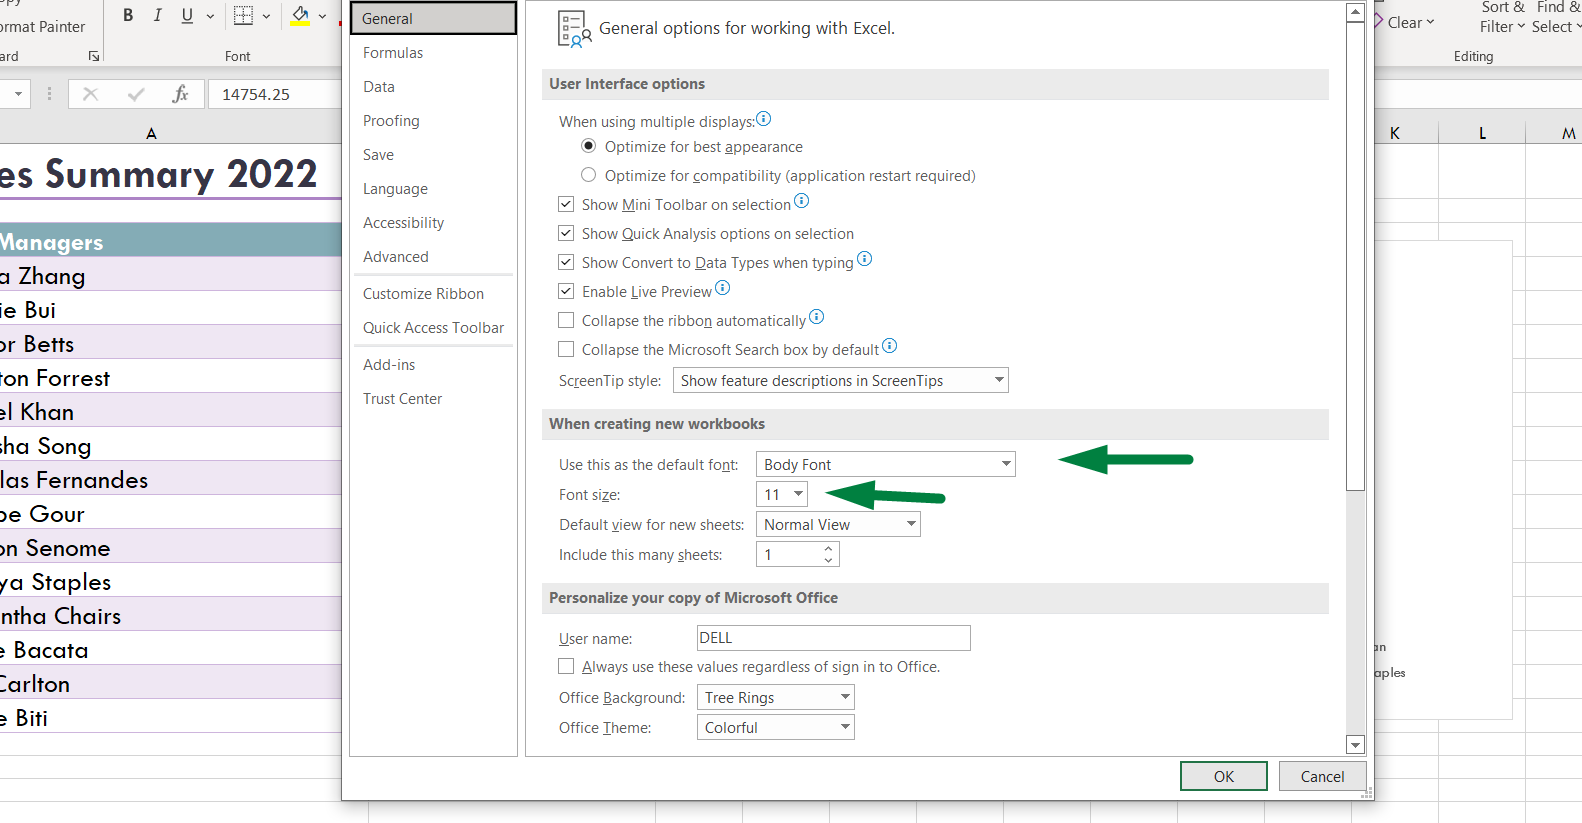
So, you will find the options named,
- “Use this as the default font” to choose the font.
- And “Font Size”.
Under the “While creating new workbooks” section.
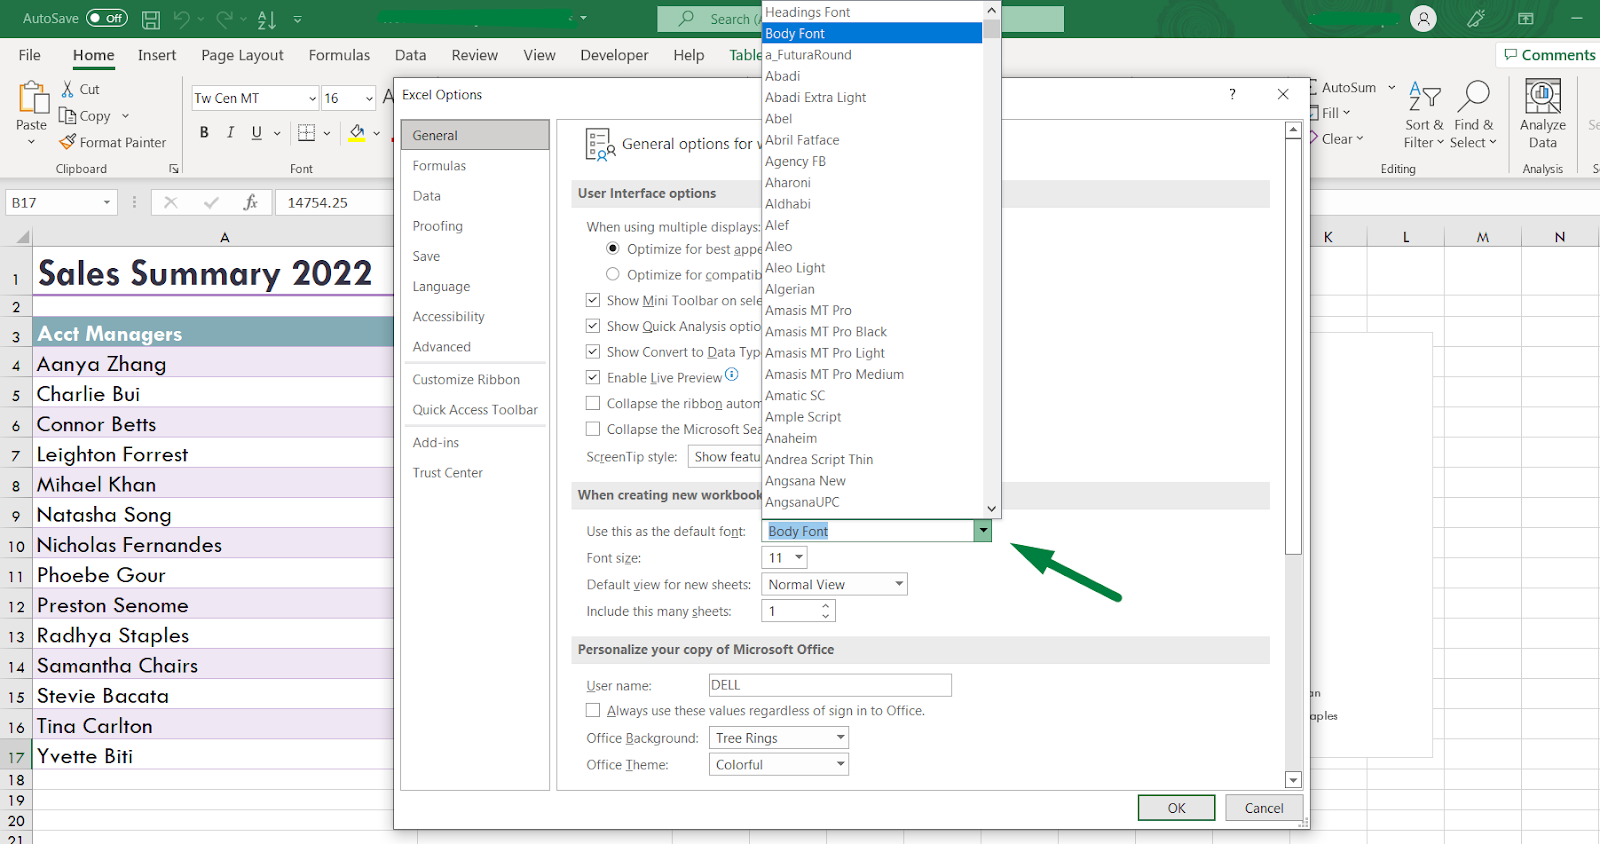
When you click on the drop-down menu of the font option, excel will show you all the options to choose from.
Usually, if the “Calibri” is selected, it will show the “Body font,” now the default font.
Choose your preferred font from the list.
You can also select your preferred font size from there.
Step 5: Click ok and restart Excel to take effect.
After selecting your preferred font and size, click ok.
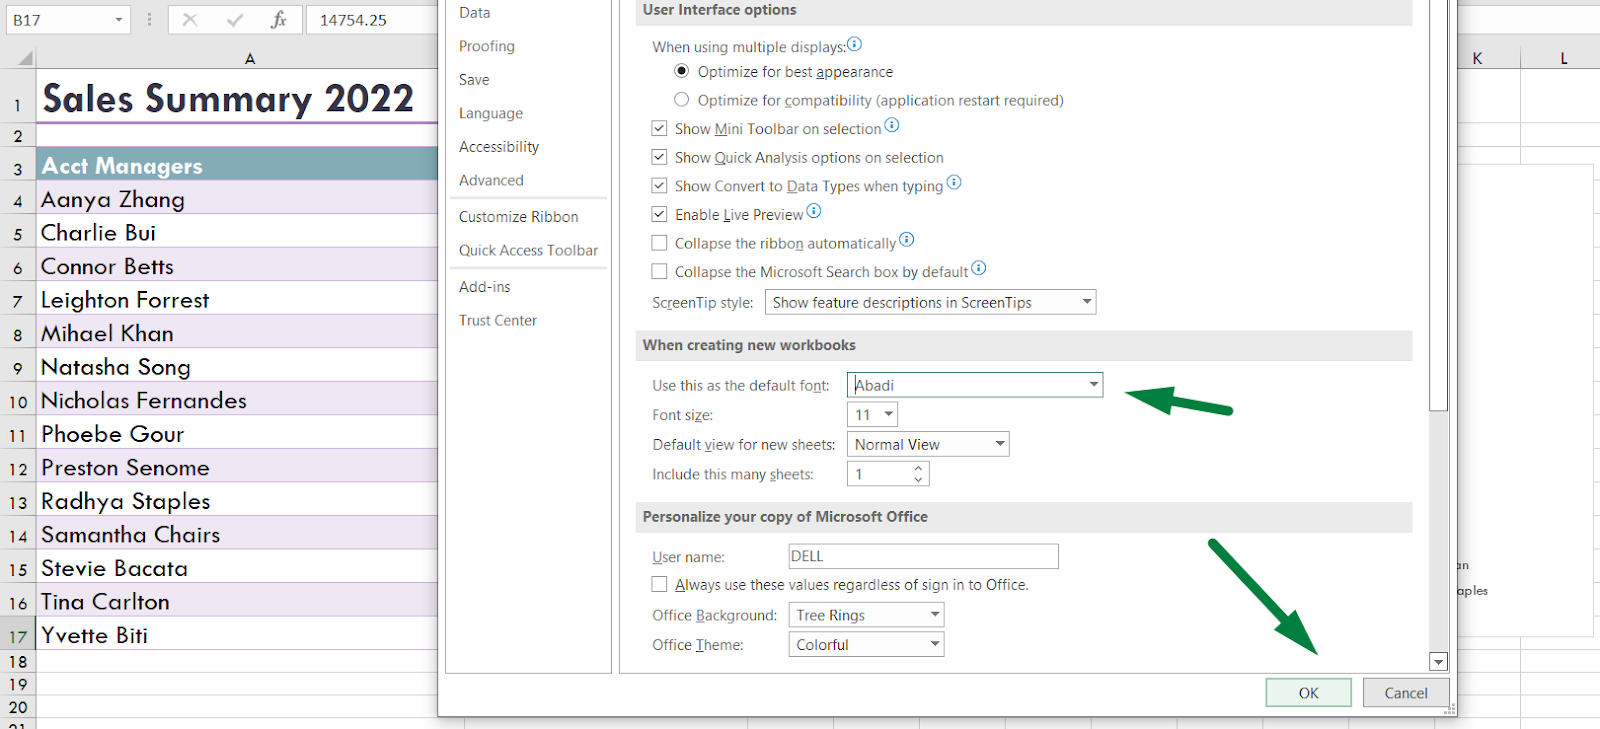
As you can see, we chose a different font named “Abadi.” You can choose any font you want.
Click ok.

After, a warning box will show you, “Please close and restart Microsoft Excel so that the font changes can take effect.”
This means you need to close the application and restart it. Only after that, when you open a new workbook, will the font and font size take effect there.
So, that was all about how to set the default font in Excel.
But you can also change the font in Excel to give your existing sheet a new look.
Set a Default Font in Excel and Save (From “Page Layout” Ribbon)
We can change the whole theme of a workbook. Or choose a font or theme and save it for later use.
How?
First, I am going to open a new workbook.
Then, go to the “Page Layout” ribbon. There you will find options named “Themes” and “Fonts” under the “Themes” section.

Excel applies that theme to the whole workbook when you choose a theme. So, when you open a new sheet, the theme is already there. You will find 26 pre-set themes there for you to use.
The same goes for the fonts. When you choose a font from there, the font for the whole workbook is changed.
After choosing a theme or font, you can save it.
Press “Ctrl + S” to save the file. Or you can save the file as a template for later use.
Click on the “File” ribbon. Go to the “Save As” option and save the file in a folder.
So, later, when you want to work on a workbook, you can just copy this workbook and use it as a template.
Summary
To summarize, we can set the default font in Excel in just 5 steps.
- Click on the “File” ribbon.
- Choose the “Options” at the bottom.
- Go to the “General” option.
- Choose “Default Font” and “Size” under the “While creating new workbooks” option.
- Click ok and restart Excel to take effect.
Conclusion
This was all about how to set the default font in Excel. I hope this article helps you with your problem.
Let us know in the comment section if you have any questions. Or any Excel-related questions.

Hi! I’m Ahsanul Haque, a graduate student majoring in marketing at Bangladesh University of Professionals. And I’m here to share what I learned about analytics tools and learn from you.